Transferring data from one data source to a specific target almost real-time implies most of the time the use of a message broker that would ingest and distribute the data.
The scenario that I’m going to describe you here, instead, is based on a near real-time end-to-end solution that uses Azure Data Factory as the orchestrator.
For both solution, though, you would need a Change Data Capture feature, or similar depending on your sources, to track and store data changes.
As I’ve spent some time trying figuring out how to get all the table changes on a big database without overloading the database server itself with jobs that would have been looping for catching the changes as they happen, I thought you may be interested into a valid alternative approch to those available already online, by using a the Change Data Capture feature in a bit more modern fashion.
Let’s consider these assumptions, though:
1. Change Data Capture is a SQL Server feature that can be enabled easily per each table we want to track. The CDC configuration is out of scope for this article and thus, there’re tons of documentation online you can use.
2. The database server is running on an Azure Cloud PaaS delivery model and a SQL Managed Instance is basically the PaaS solution of a SQL Server implementation that you could have had On-Premises. The Cloud PaaS approach has severl benefits, though, such as hiding the underlying management of the server itself and ease the scalability and high-availability of the solution.
3. A strict requirement is to avoid overloading the SQL Server with computantion that are not related to the source platform.
4. The scope of my solution is to build a Data Hub with data coming from multiple platform such as REST APIs, databases and general events happening in the context of the data that I need to collect.
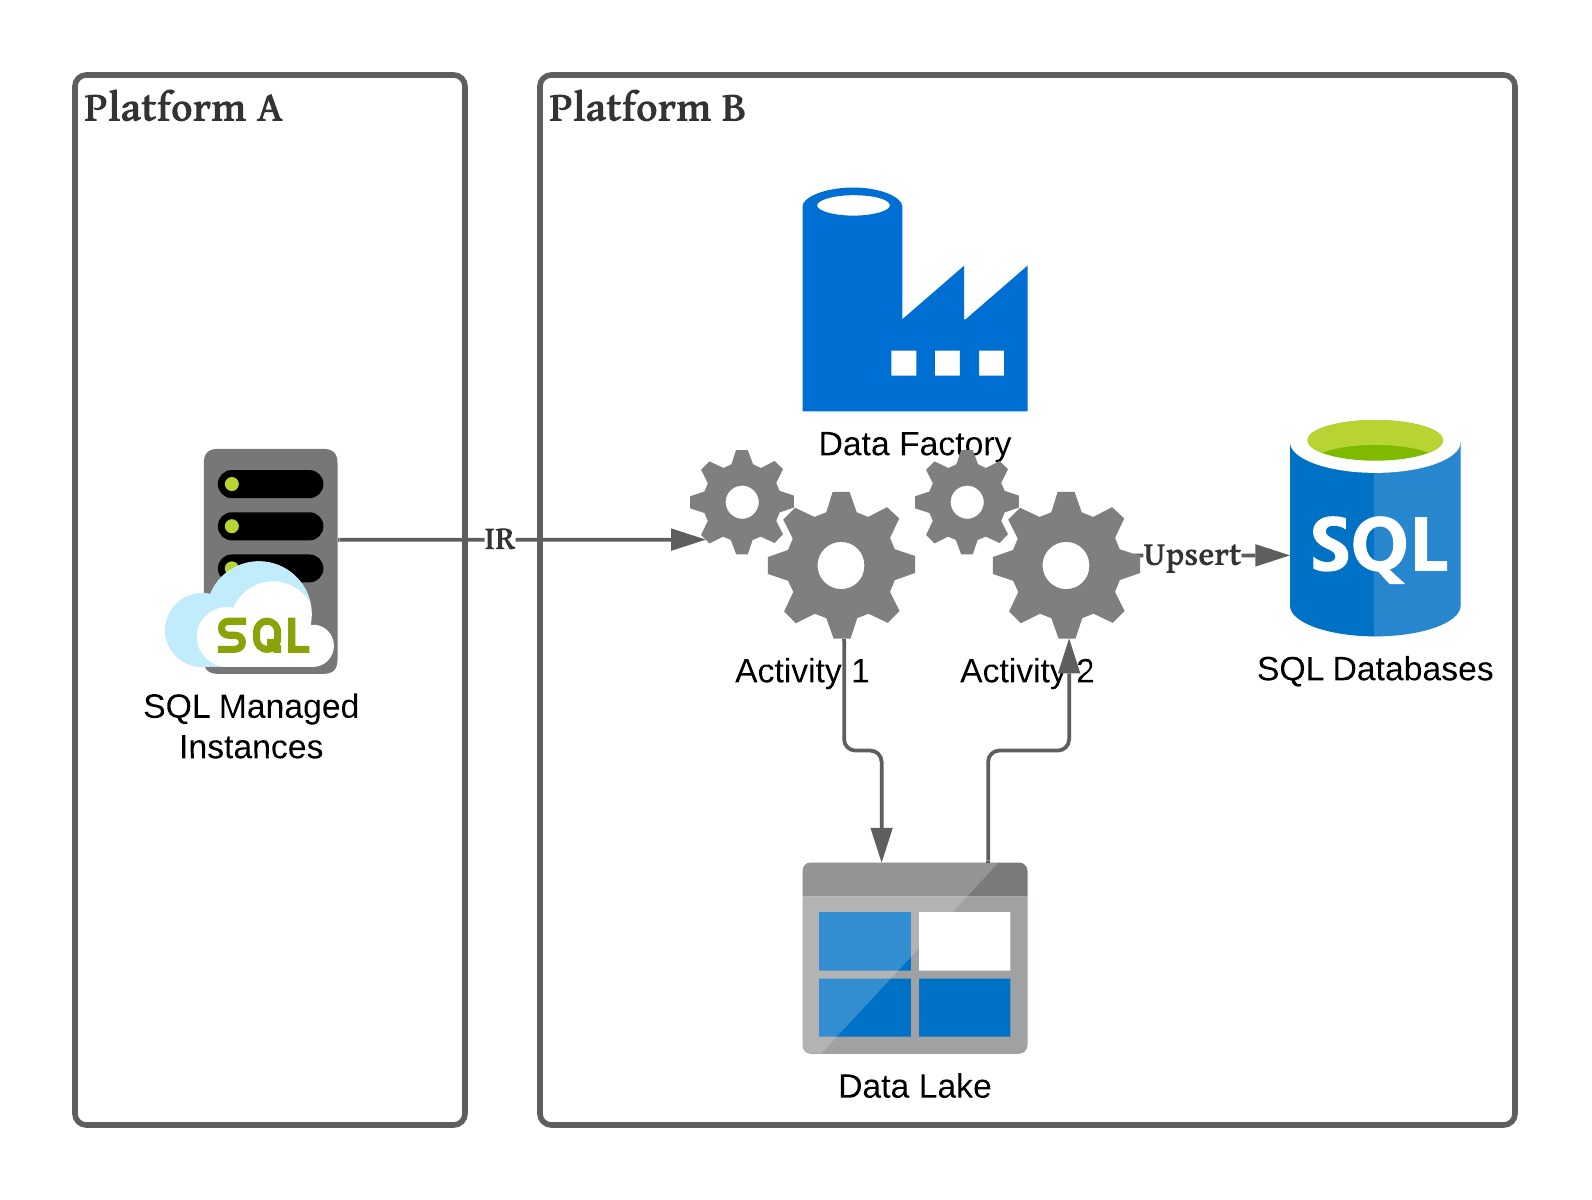
Hence, here I’m going to explain you a small part of a bigger Data Hub solution in the context of the Azure Cloud, and this below is what I’m going to highlight.

As Google is a wonderful resource to avoid to re-invent the wheel, I’m not loathe to admit I’ve googled a lot but the only suggestions I’ve found valuable were:
1. An old but still very interesting article about running a piece of code for each table that would push table changes to an Azure Event Hub. Nice article but I prefer other approaches. And, nevertherless this solution was meant to run a job on the source SQL Server side that would have overloaded the server itself.
2. Debezium, a wonderful component based on Apache Kafka and connectors to any kind of database that would listen to changes as they happen and tranfer them all to an Apache Kafka implementation. This solution is wonderful if you don’t have to stick to PaaS services from a specific Cloud provider and rather prefer to go for an OpenSource approach. I like this solution the most but my primary constraint was to stick to an Azure PaaS delivery model using Azure Data Factory, Azure SQL database, Azure Event Hub and Azure Stream Analytics.
3. An Azure DataFactory approach to store data in storage accounts CSV format files.
That being said, I had to find a solution myself and a nice article from Microsoft was pointing me out to the right direction, obviously!
So, let’s get started.
First, enable your CDC feature on the source database and track your tables. This feature will create several system tables, one per each table you’re tracking. Don’t worry for the extra amount of data stored, the default data retention is configured to be erased after 3 days, nonetheless you can change this configuration easily.
Create your Data Factory environment. There are tons of documentation for doing so.
Create a self-hosted Integration Runtime, IR, if you have specific needs. Otherwise, you can opt to use the Azure IR but you have to make sure it can connect to your data sources. In my case, I had to spin up a Virtual Machine with a dedicated IR as the two solutions were running on different private networks and the networking behind the scene is a bit complex, with firewall and routing rules. For less complex environment, the Azure IR is quite good.
Create your Linked services. This is basically a connection to your data source, in our scenario, the SQL Server Managed Instance and to the target storage. In our case, the target storages are respectively, Azure Storage Account Gen2 Data Lake and Azure SQL Database.
A Linked service is just the connector specification to your data source/target. A linked service can be used multiple time with different specification based on your needs. To do so, you have to create a dataset specification on top of your linked service.
For this scenario, you should have now three Linked services and three dataset specifications.
Nice! Let’s move on. From now on, up until the final copy of the data to a parquet file in the Azure DataLake, the Microsoft documentation is pretty fine and easy to follow. I’ll try to walk you quickly through it with the steps to take.
It’s also important to note that I wanted to avoid further staging tables in the target solution and rather preferred to use in-memory tables. I don’t want staging tables as I already have my parquet files as the history of the changes. However, this choice may have added a bit of complexity in the stored procedure to define but I think it’s much more clean and smooth.
• First create a Stored Procedure per each table you want to get the changes from. These SPs will serve the scope of upserting the target table based on the __$operation coming from the CDC. These SPs are not very standard ones. They expect a recordset of the change and per each change, they iterate to update/insert or delete records in the target table. To do so, we also need another small object in the target database: a table type. Basically, you need to define a data type for the recordset you are receiving from the CDC, in order to map each field and be able to use it as a in-memory table.
In order to keep this pipeline as much decoupled and reusable as possible, I will be using several pipeline parameters. This will allow you to run this pipeline independently by the table you are tracking.
• Create your pipeline, assign it a name and add a LookUp activity. The Lookup activity will count the changes in the table you’re tracking in the source system using a simple query. Watch out the pipelines’ parameters I’m using here. I will do this in the entire chain in order to have one pipeline that I can use for any CDC table I’m tracking.
@{concat(‘DECLARE @from_lsn binary(10), @to_lsn binary(10);

 SET @from_lsn =sys.fn_cdc_get_min_lsn(‘’’, pipeline().parameters.CDC_Schema, ‘_’, pipeline().parameters.CDC_Table, ‘’’);

 SET @to_lsn = sys.fn_cdc_map_time_to_lsn(‘’largest less than or equal’’, GETDATE());

 SELECT count(1) changecount FROM cdc.fn_cdc_get_all_changes_’, pipeline().parameters.CDC_Schema, ‘_’, pipeline().parameters.CDC_Table, ‘(@from_lsn, @to_lsn, ‘’all’’)’ )}
• Add an If Condition and evaluate the output from the Lookup activity. If the count is greater than 0, then click on the “true statement”’s edit icon and add a Copy activity.
• In the IF true activities I would suggest to freeze a Timestamp and create a defined file structure that can be used along by whole chain of the true statement. Something like:

• The Copy Data activity is used to get the changes from the CDC table and store them all in a Parquet file into the DataLake container. Why this step? Well, it is a good practice to store data that you transfer from one source to a target solution, as this provides multiple benefits: you can rerun the whole solution in case something goes south for any reason. Basically you can reproduce the whole chain of changes happened during the history of events. Another benefits is that you can use Big data tools, such as Databrick, Azure Synapse with Apache Spark, EMR and so on, to query and analyse all the data and come up with whatever fancy requirement the business may have requested. Last but not least, you have historical data.
• In the Source tab choose your data source dataset and add this query:
@{concat(….

SELECT * FROM cdc.fn_cdc_get_all_changes_’, pipeline().parameters.CDC_Schema, ‘_’, pipeline().parameters.CDC_Table, ‘(@from_lsn, @to_lsn, ‘’all’’)’

)}
• The above is basically the same query as before with a simple substitution. I’ve replaced the select count() with the select * to get the actual changes.
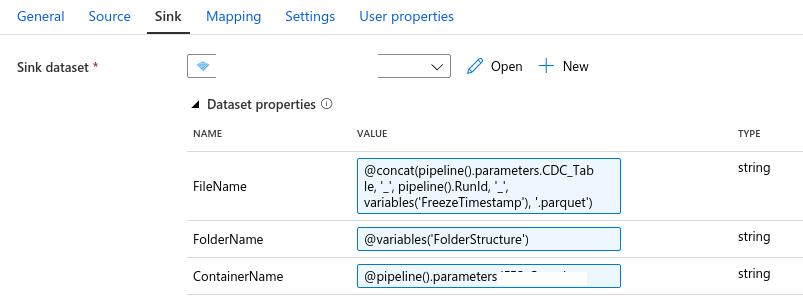
• In the Sink of this activity, just choose your storage account dataset created at the beginning of this journey and set the parameters required to allow this pipeline to be fully decoupled and reusable for any other solution you may have. :)

• Now that our changes have been saved into a parquet file, we can add another Copy Data activity to transfer the changes from the parquet to the final database, Azure SQL database. Here comes a bit of complexity, though.
• The Source is the same as the Sink from the previous Copy data activity. No differences.
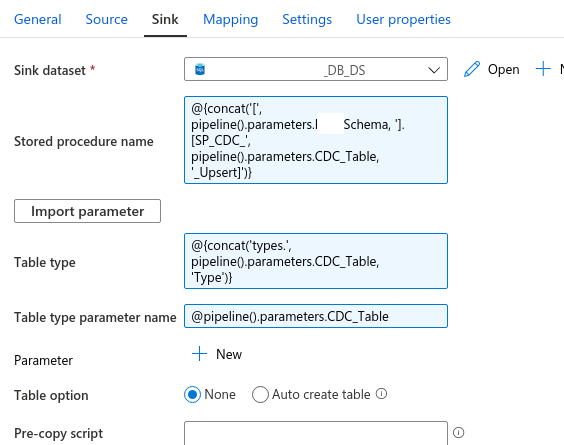
• The Sink of this new activity instead is the final database. Nevertheless, this time, you have to use the stored procedure created in the target database passing a couple of parameters. Watch out all the pipeline parameters I’m using to keep this pipeline’s activities fully decoupled.
• The parameters I’m passing to this store procedure are required to tell the SP which type of recordset we are passing to it and how to deal with that.

Now you can run your pipeline in debug mode and check for any error. After you fix all of them, the final pipeline is ready to be embedded into a new one that will take care of dealing with parallel running, configuration management and some more tricky things you should consider before moving this pipeline to a production environment. ;)
However, the final result is astonishing if you consider that this is based on a table with more than 2M records on a target database without indexes. It just took 1m and 4s end-to-end with 4 operations (3 updates and 1 insert). This results can also be improved a bit more by scaling a bit more the Serveless Azure SQL Database target database, adding one very simple index during the nightly load of this table and reduce the real-time daily streaming to be faster.
![]()
Hope this article helped you with an alternative approach to those you’ve already overlooked online for a near real-time data transfer using CDC through a “relatively” modern approach.
Good luck!